Analyzing Big Data using PySpark, PgAdmin and Amazon Web Services
Project goal
Analyze Amazon reviews written by members of the paid Amazon Vine program to determine if having a paid Vine review makes a difference in the percentage of 5-star reviews.
Tools, Dataset , Project Description
The Extract, Transform, and Load (ETL) process was used on the Amazon Shoes Department dataset. PgAdmin was utilized to connect to Amazon Web Service (AWS), PySpark and PostgreSQL were used against the Dataset to create four separate DataFrames to match the table schema in PgAdmin. The transformed data was then uploaded into AWS RDS.
This project focused on practicing the ETL (Extract, Transform, and Load) process in the cloud. The Amazon Reviews dataset with reviews of a specific product was selected from an AWS resource (approximately 50 datasets).
The ETL process was performed to extract the datasets, transform the data to match SQL schemas, connect and loaded into an AWS RDS instance, and then load into pgAdmin.
Then, PySpark, Pandas, and SQL were used to determine if there was any bias toward favorable reviews from Vine members in the datasets.
Finally, a summary of the analysis was written.
Topics Explored
- Big data and the challenges associated with it.
- Hadoop and the main elements of its ecosystem.
- How MapReduce processes data.
- Spark and how it processes data.
- How NLP collects and analyzes text data.
- How to use AWS Simple Storage Service (S3) and relational databases for basic cloud storage.
- Analysis of an Amazon customer review.
Project implementation
Cloud Storage with S3 on AWS
AWS's Simple Storage Service
S3 is Amazon's cloud file storage service that uses key-value pairs. Files are stored on multiple servers and have a high rate of availability of more than 99.9%. To store files, S3 uses buckets, which are similar to folders or directories on your computer. Buckets can contain additional folders and files. Each bucket must have a unique name across all of AWS.
One of S3's perks is its fine-grained control over files. Each file or bucket can have different read and write permissions, which helps regulate what can be done with each file.
S3 is also very scalable—you are not limited to the memory of one computer. As data flows in, more and more can be stored, as opposed to a local computer that is limited by available memory. Additionally, it offers availability—several team members can access massive amounts of data from one central location.
PySpark and S3 Stored Data
Since PySpark is a big data tool, it has many ways of reading files from data storage so that we can manipulate them. We have decided to use S3 as our data storage, so we'll use PySpark for all data processing.
Using PySpark is how we've been reading our data into Google Colab. The format for reading in from S3 is the S3 link, followed by your bucket name, folder by each folder, and then the filename, as follows:
For US East (default region)
template_url = "https://<bucket-name>.s3.amazonaws.com/<folder-name>/<file-name>"
example_url = "https://dataviz-curriculum.s3.amazonaws.com/data-folder/data.csv" For other regions
template_url = "https://<bucket-name.s3-
example_url =" https://dataviz-curriculum.s3-us-west-1.amazonaws.com/data-folder/data.csv"
PySpark ETL (Extract, Transform, and Load)
Our goal is to get this raw data from S3 into an RDS database.
We already have three tables set up in the RDS database and would like to get the raw data from S3 into the database. Create a new database in pgAdmin called "my_data_class_db." We'll have it represent the database by first running the following schema in pgAdmin for our RDS:
-- Create Active User Table
CREATE TABLE active_user (
 id INT PRIMARY KEY NOT NULL,
 first_name TEXT,
 last_name TEXT,
 username TEXT
);

CREATE TABLE billing_info (
 billing_id INT PRIMARY KEY NOT NULL,
 street_address TEXT,
 state TEXT,
 username TEXT
);

CREATE TABLE payment_info (
 billing_id INT PRIMARY KEY NOT NULL,
 cc_encrypted TEXT
);
NOTE Table creation is not part of the ETL process. We're creating the tables to represent a pre-established database you need for the raw data. In a real-life situation, databases will already have a well-defined schema and tables for you, as the engineer, to process data into.
Start with creating a new notebook, and installing Spark:
import os
# Find the latest version of spark 3.0  from http://www-us.apache.org/dist/spark/ and enter as the spark version
# For example:
# spark_version = 'spark-3.0.2'
spark_version = 'spark-3.<enter version>'
os.environ['SPARK_VERSION']=spark_version

# Install Spark
!apt-get update
!apt-get install openjdk-11-jdk-headless -qq > /dev/null
!wget -q http://www-us.apache.org/dist/spark/$SPARK_VERSION/$SPARK_VERSION-bin-hadoop2.7.tgz
!tar xf $SPARK_VERSION-bin-hadoop2.7.tgz
!pip install -q findspark

# Set Environment Variables
import os
os.environ["JAVA_HOME"] = "/usr/lib/jvm/java-11-openjdk-amd64"
os.environ["SPARK_HOME"] = f"/content/{spark_version}-bin-hadoop2.7"

# Start a SparkSession
import findspark
findspark.init()
We use Spark to write directly to our Postgres database. But in order to do so, there are a few more lines of code we need.
First, enter the following code to download a Postgres driver that will allow Spark to interact with Postgres:
!wget https://jdbc.postgresql.org/download/postgresql-42.2.16.jarYou should get a message containing the words "HTTP request sent, awaiting response… 200 OK," indicating that your request was processed without a problem. Then, start a Spark session with an additional option that adds the driver to Spark:
from pyspark.sql import SparkSession
spark = SparkSession.builder.appName("CloudETL").config("spark.driver.extraClassPath","/content/postgresql-42.2.16.jar").getOrCreate()
We have performed the first two steps of the ETL process before with PySpark, so let's quickly review those.
Extract We can connect to data storage, then extract that data into a DataFrame. We'll do this on two datasets, and be sure to replace the bucket name with one of your own.
We'll start by importing SparkFiles from PySpark into our notebook. This will allow Spark to add a file to our Spark project.
Next, the file is read in with the read method and combined with the csv() method, which pulls in our CSV stored in SparkFiles and infers the schema. SparkFiles.get() will have Spark retrieve the specified file, since we are dealing with a CSV. The "," is the chosen separator, and we will have Spark determine the head for us. Enter the following code:
# Read in data from S3 Buckets
from pyspark import SparkFiles
url ="https://YOUR-BUCKET-NAME.s3.amazonaws.com/user_data.csv"
spark.sparkContext.addFile(url)
user_data_df = spark.read.csv(SparkFiles.get("user_data.csv"), sep=",", header=True, inferSchema=True)
Finally, an action is called to show the first 10 runs and confirm our data extraction by entering the following code:
# Show DataFrame
user_data_df.show()
Repeat a similar process to load in the other data. Enter the code:
url ="https://YOUR-BUCKET-NAME.s3.amazonaws.com/user_payment.csv"
spark.sparkContext.addFile(url)
user_payment_df = spark.read.csv(SparkFiles.get("user_payment.csv"), sep=",", header=True, inferSchema=True)

# Show DataFrame
user_payment_df.show()
Transform Now that the raw data stored in S3 is available in a PySpark DataFrame, we can perform our transformations.
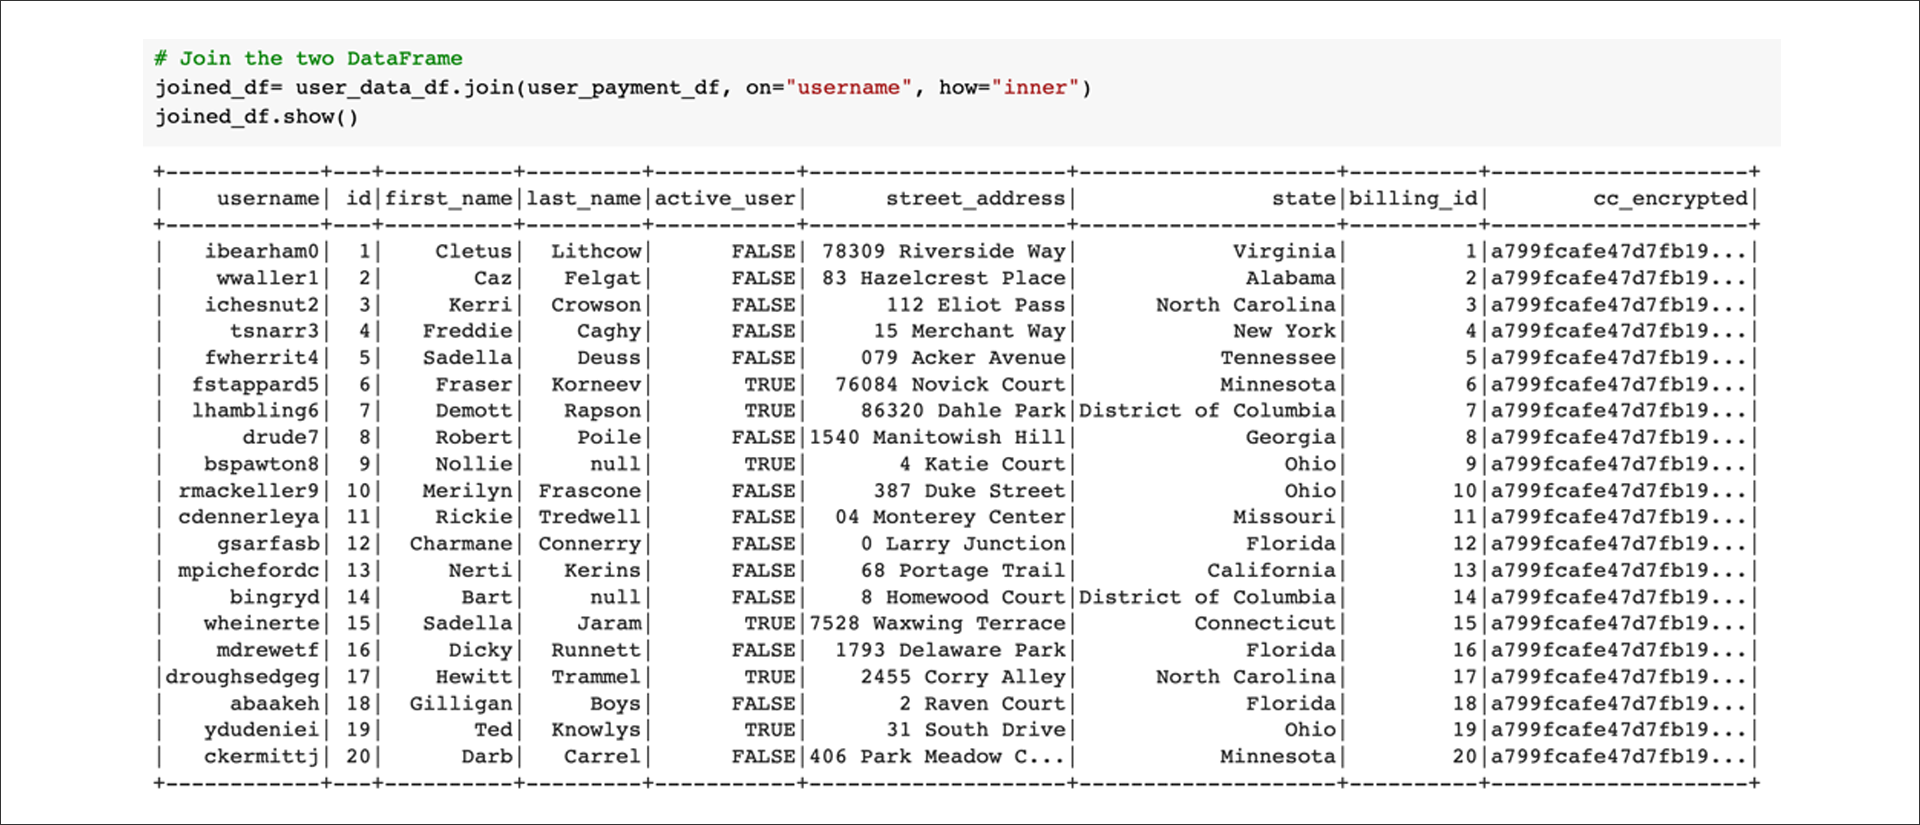
First, join the two tables:
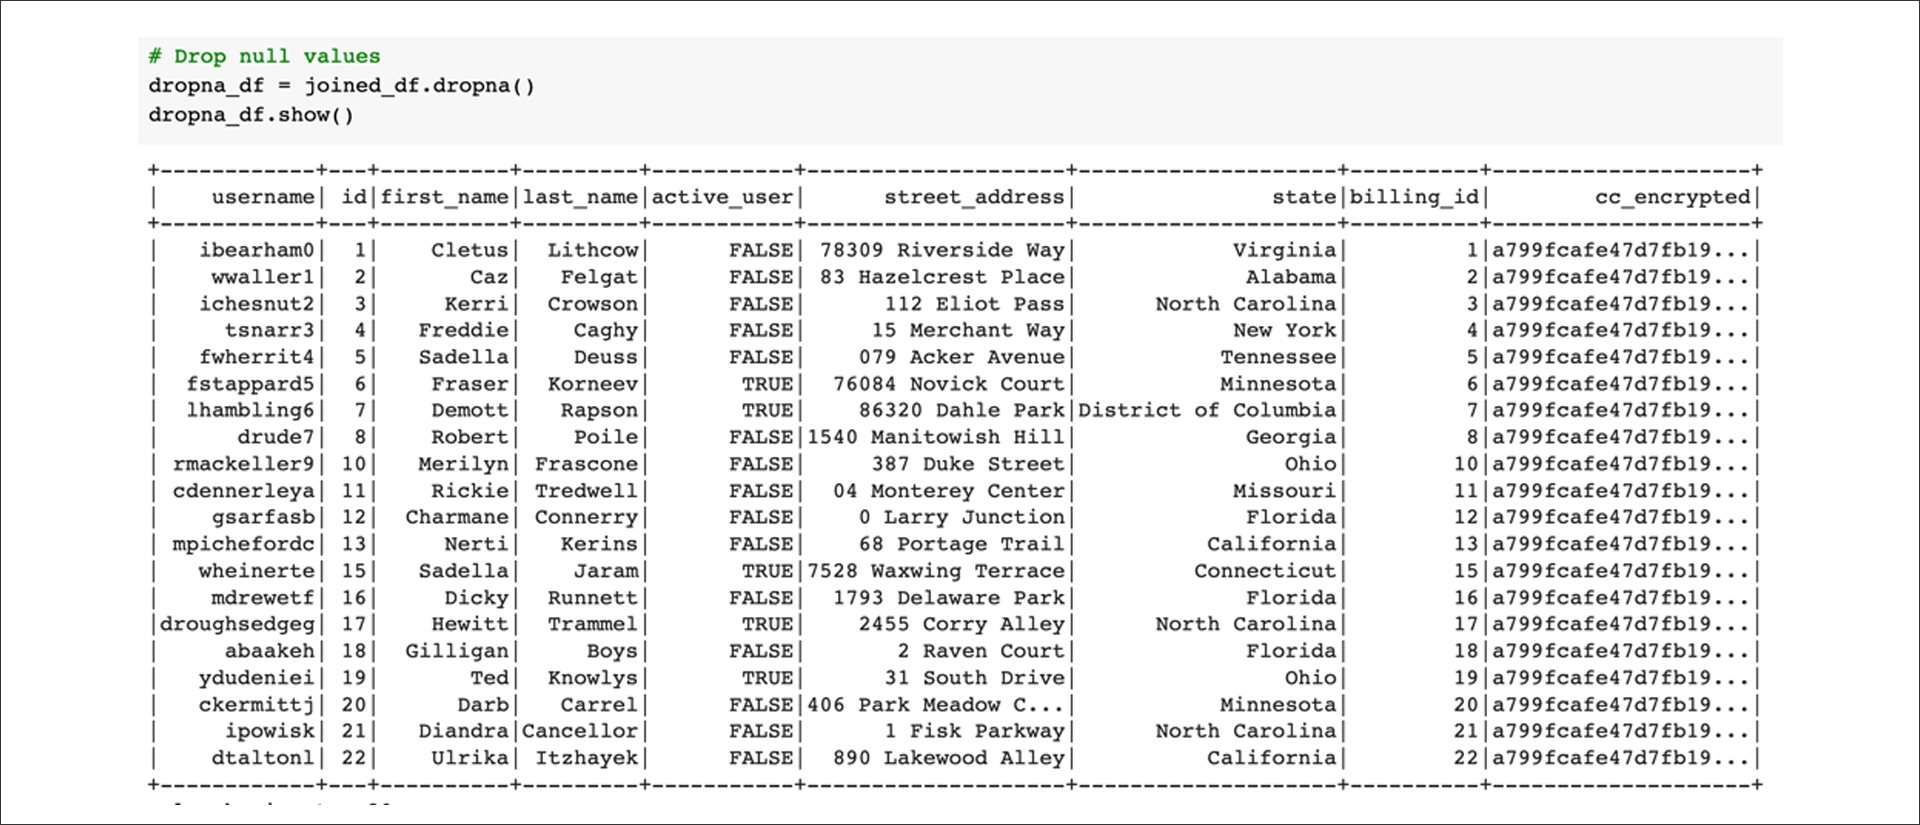
Next, drop any rows with null or "not a number" (NaN) values:
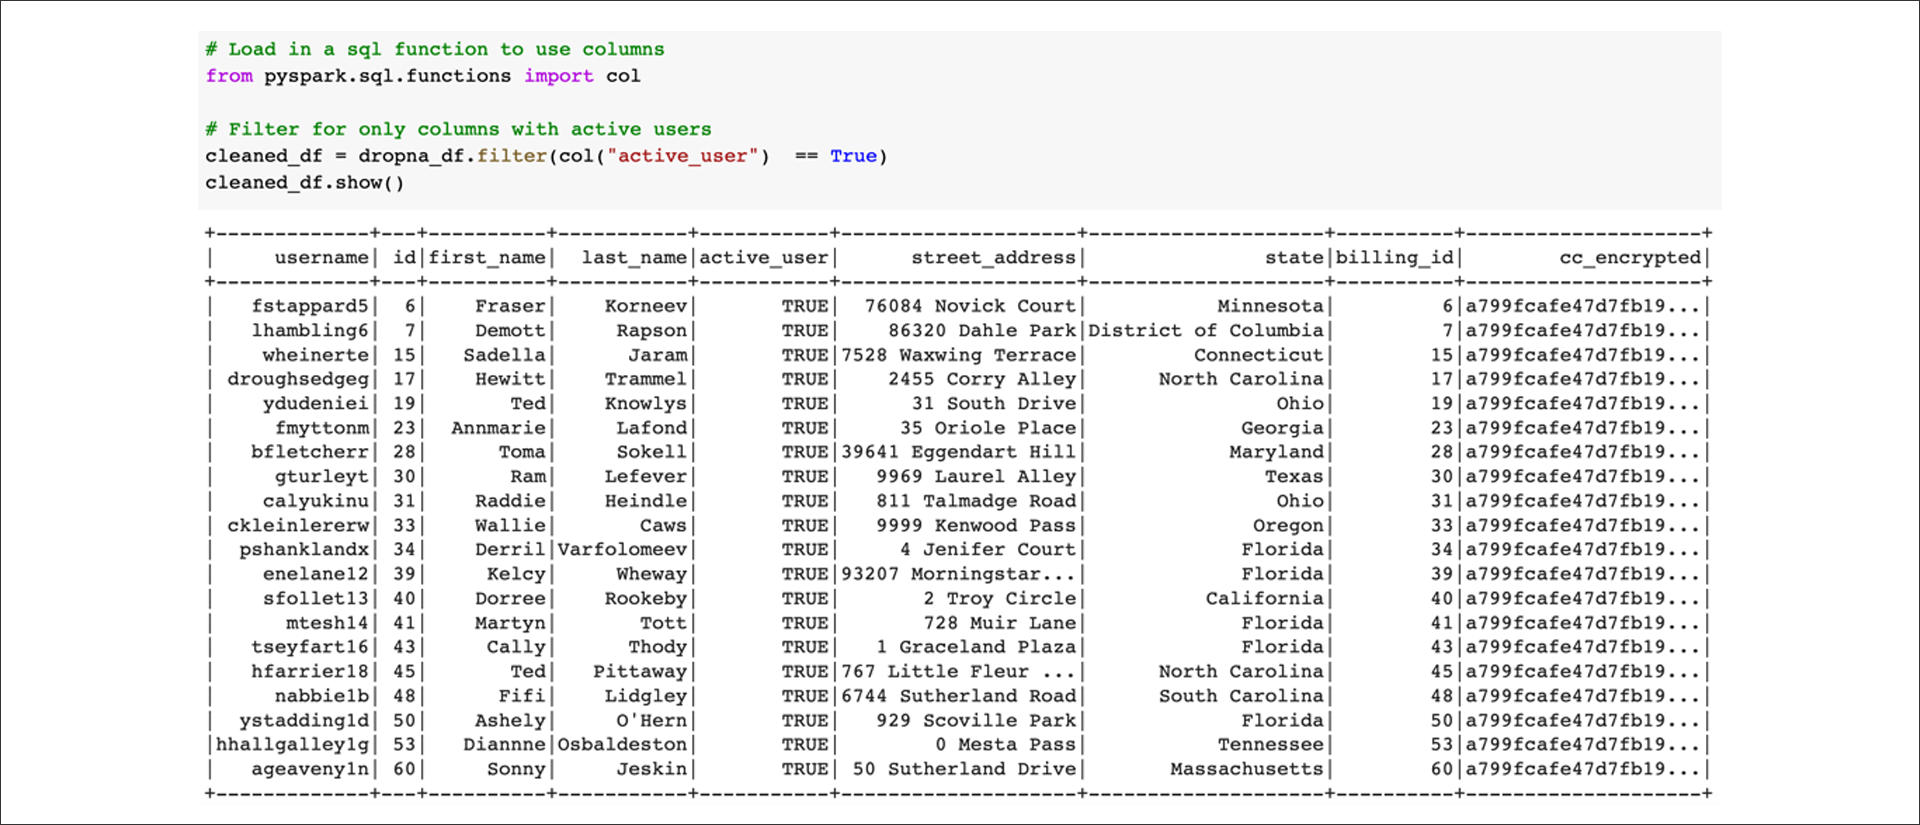
Filter for active users:
Next, select columns to create three different DataFrames that match what is in the AWS RDS database. Create a DataFrame to match the active_user table:
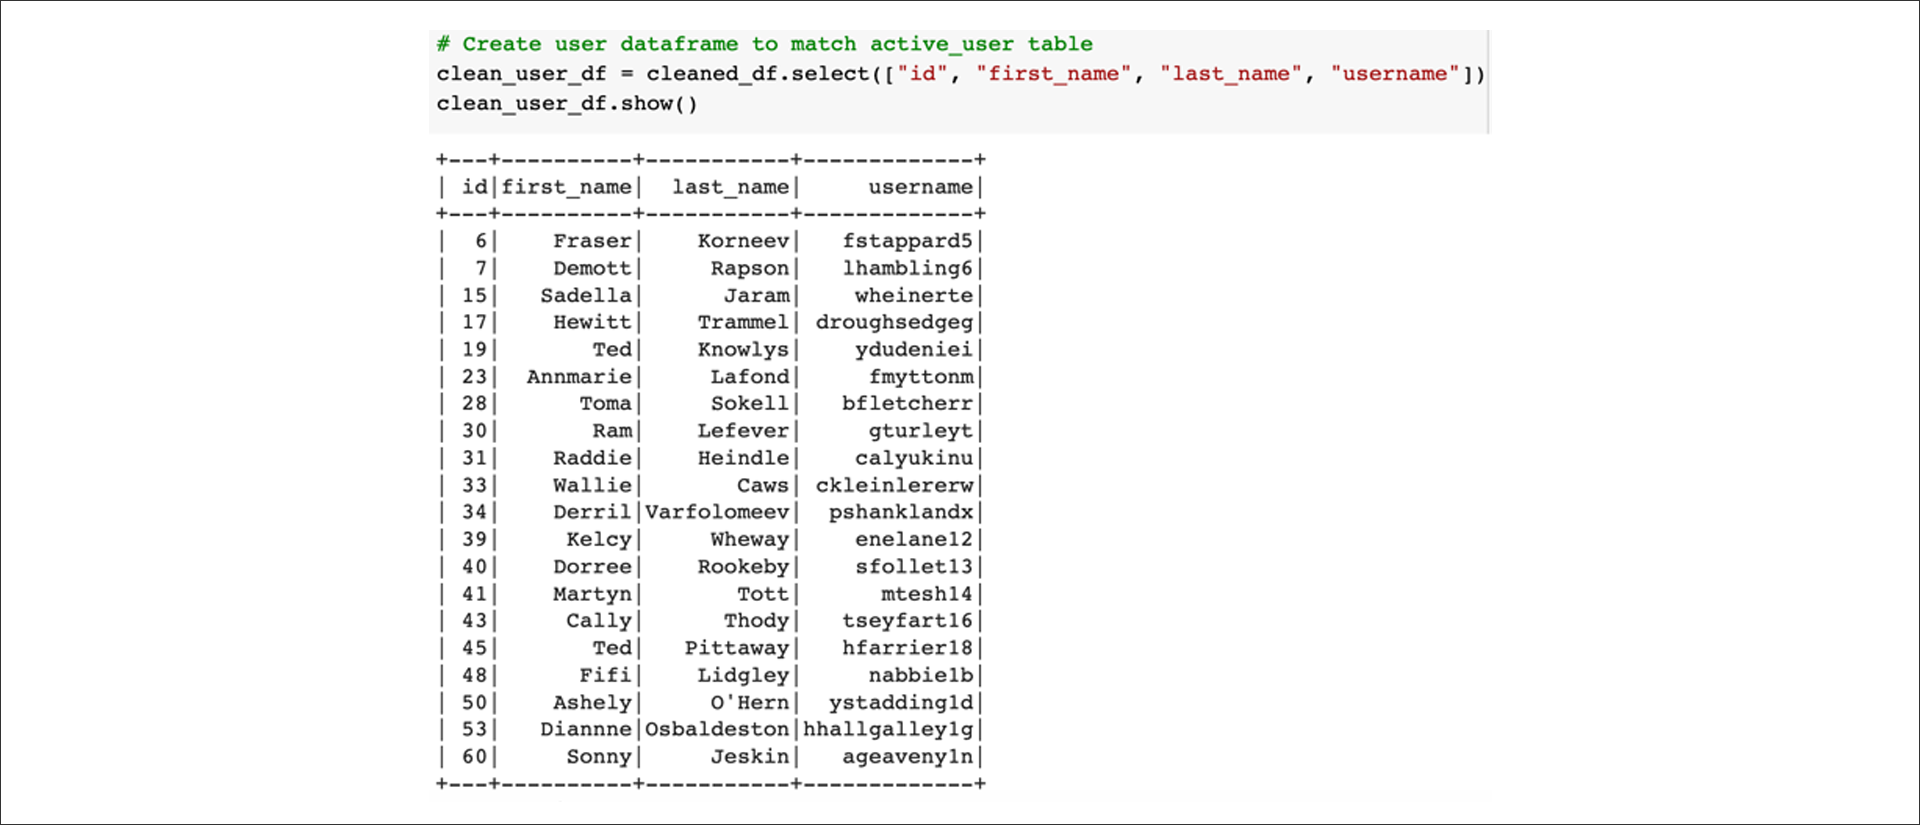
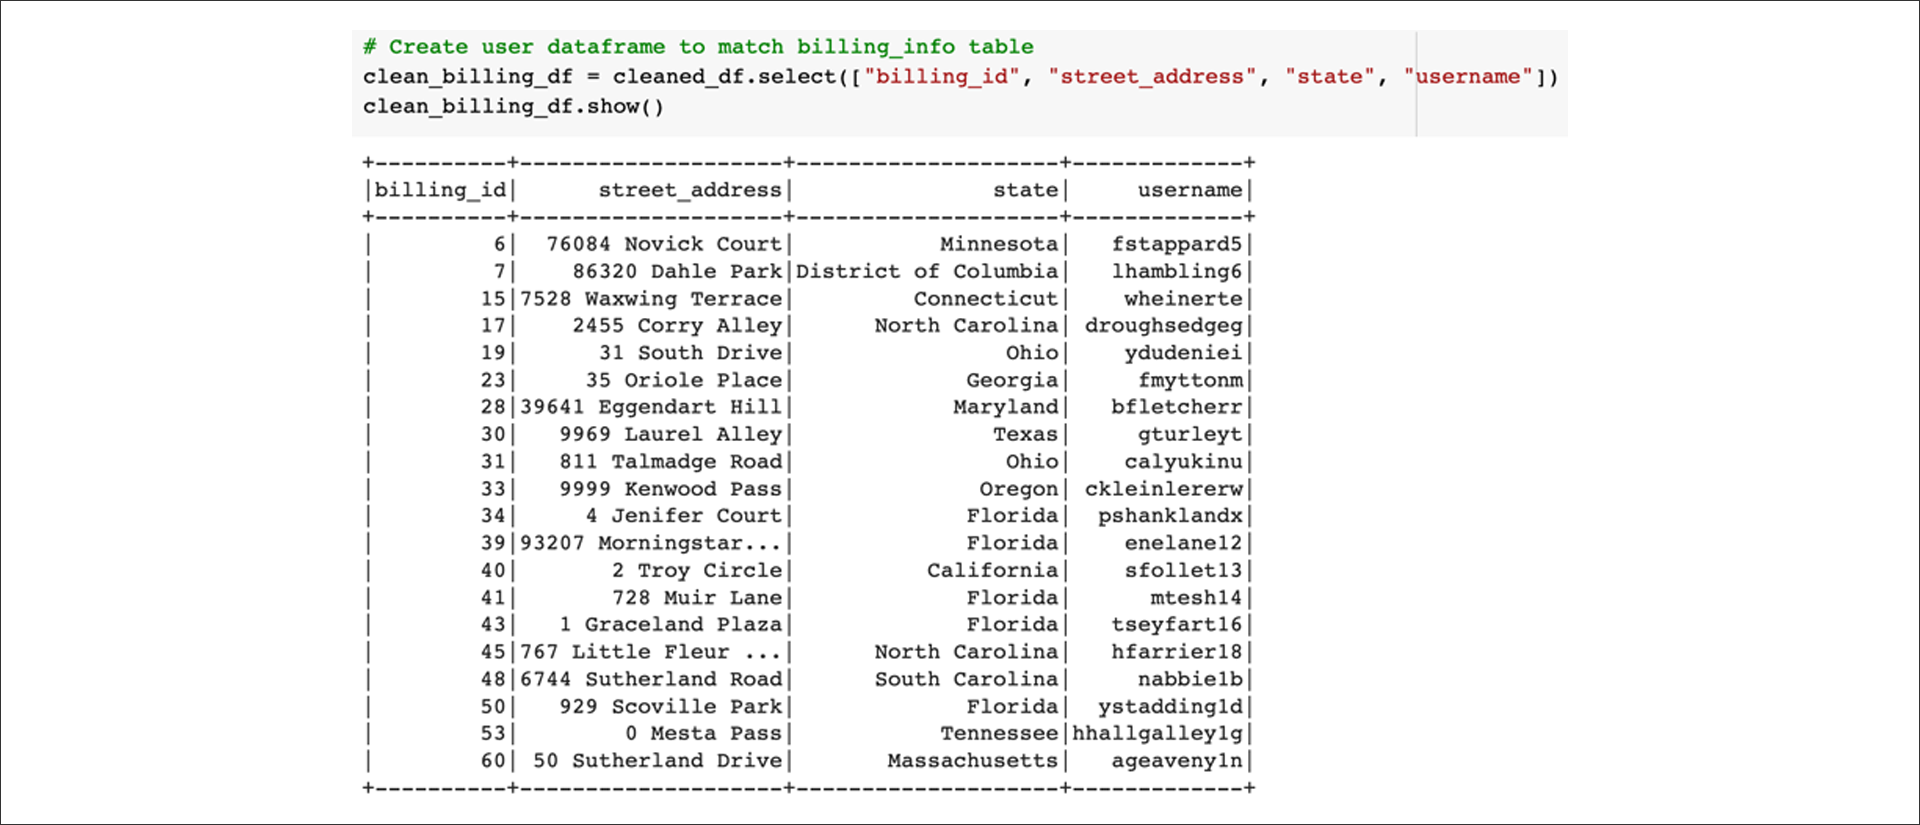
Next, create a DataFrame to match the billing_info table:
Finally, create a DataFrame to match the payment_info table:

Once our data has been transformed to fit the tables in our database, we're ready to move on to the "Load" step.
Load
The final step is to get our transformed raw data into the database. PySpark can easily connect to a database to load the DataFrames into the table. First, we'll do some configuration to allow the connection with the following code:
# Configure settings for RDS
mode = "append"
jdbc_url="jdbc:postgresql://<connection string>:5432/<database-name>"
config = {"user":"postgres",
          "password": "<password>",
          "driver":"org.postgresql.Driver"}
We'll need to provide a username and password, and also supply the AWS server name where <connection string> is located in the code above. To find it in PgAdmin, right-click AWS in the Server directory listing on the left side of PgAmin, and then select Properties in the drop-down menu. Select the Connection tab in the window that opens, and then select the address in the Host name/address field. Copy that address and paste it in place of <connection string>.
Let's further break down what's happening here:
modeis what we want to do with the DataFrame in the table, such asoverwriteorappend. We'll append it to the current table because every time we run this ETL process, we'll want more data added to our database without removing any.- The
jdbc_urlis the connection string to our database.
- Replace
<connection string>with the endpoint connection url found from the AWS RDS console. - Replace
<database name>with the name of your database, you wish to connect to.
- A dictionary of configuration that includes the
user,password, anddriverto what type of database is being used.
- The
userfield is the username for your database, which should bepostgresif you followed with the creation of the RDS instance. Otherwise, enter the one you created. - The
passwordwould be the password you created when making the RDS instance.
NOTE
If you forget anything like the name of the database or user name you can check on pgAdmin for these values. Be sure that you are entering the name of the database and not the name of your server in the connection string.
The cleaned DataFrames can then be written directly to our database by using the .write.jdbc method that takes in the parameters we set:
The connection string stored in jdbc_url is passed to the URL argument.
The corresponding name of the table we are writing the DataFrame to.
The mode we're using, which is "append."
The connection configuration we set up passed to the properties.
The code is as follows:
# Write DataFrame to active_user table in RDS
clean_user_df.write.jdbc(url=jdbc_url, table='active_user', mode=mode, properties=config)

# Write dataframe to billing_info table in RDS
clean_billing_df.write.jdbc(url=jdbc_url, table='billing_info', mode=mode, properties=config)

# Write dataframe to payment_info table in RDS
clean_payment_df.write.jdbc(url=jdbc_url, table='payment_info', mode=mode, properties=config)
Double-check our work and running queries in pgAdmin on our database to confirm that the load did exactly what we wanted:
-- Query database to check successful upload
SELECT * FROM active_user;
SELECT * FROM billing_info;
SELECT * FROM payment_info;
Perform ETL on Amazon Product Reviews
Using the cloud ETL process, create an AWS RDS database with tables in pgAdmin, pick a dataset from the Amazon Review datasets, and extract the dataset into a DataFrame. 
Then, transform the DataFrame into four separate DataFrames that match the table schema in pgAdmin. 
Then, upload the transformed data into the appropriate tables and run queries in pgAdmin to confirm that the data has been uploaded.
Steps:
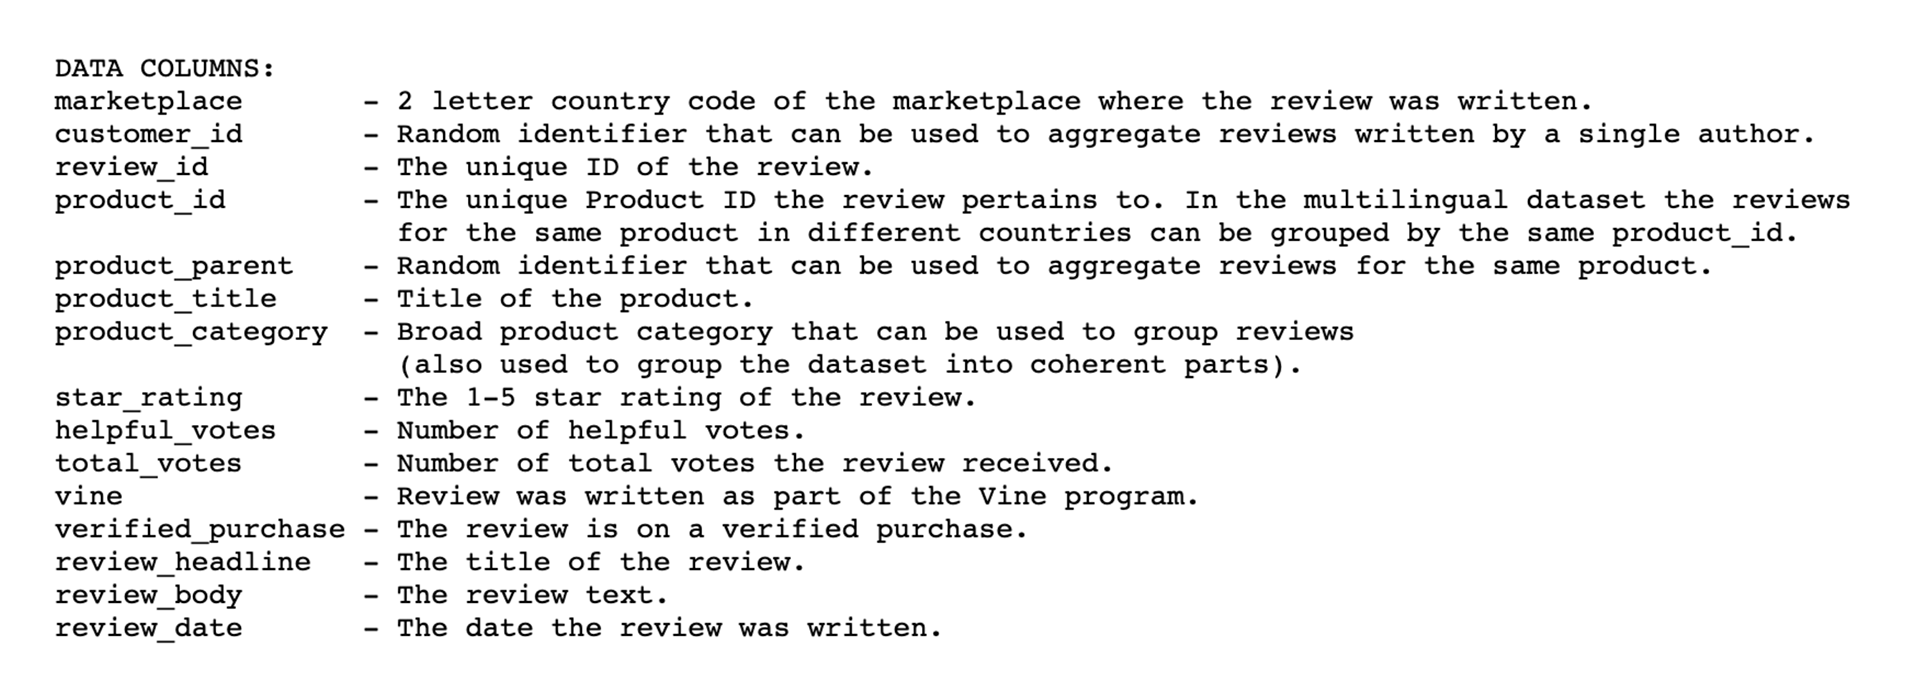
- From the following Amazon Review datasets, pick a dataset that you would like to analyze. All the datasets have the same schemata, as shown in this image:
Create a new database with Amazon RDS.
In pgAdmin, create a new database in your Amazon RDS server that you just create.
- Use the SQL queries :
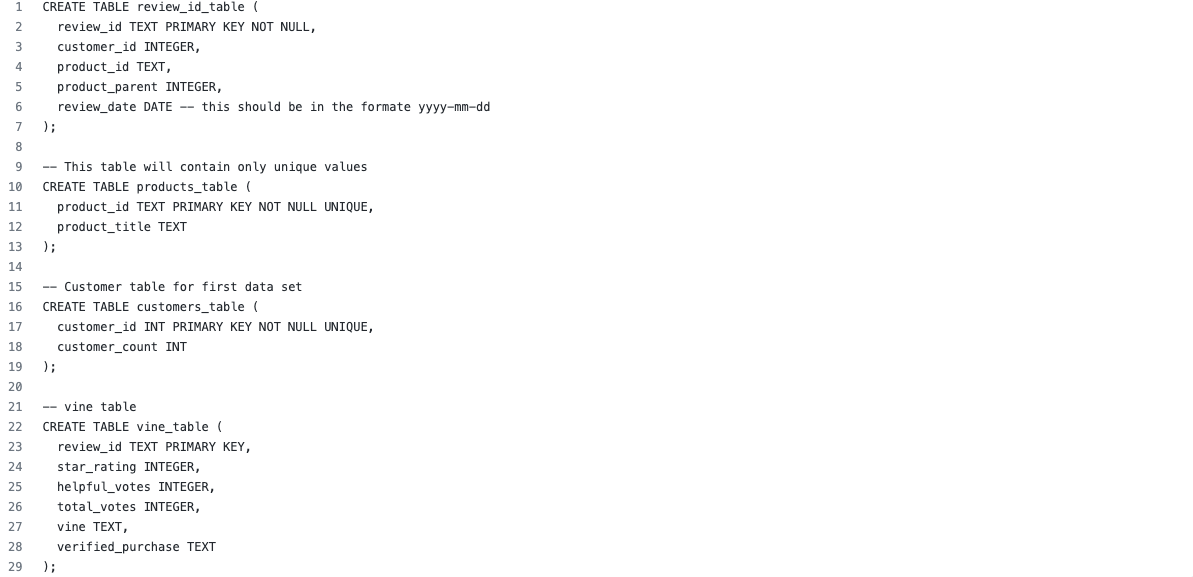
- In pgAdmin, run a new query to create the tables for your new database using the SQL code from the previous step.
- After you run the query, we will have the following four tables in the database: customers_table, products_table, review_id_table, and vine_table.
- Download the
Amazon_Reviews_ETL_starter_code.ipynbfile, then upload the file as a Google Colab Notebook, and rename itAmazon_Reviews_ETL.
NOTE
If you try to open the
Amazon_Reviews_ETL_starter_code.ipynbwith jupyter notebook it will give you an error.
- First extract one of the review datasets, then create a new DataFrame.
- Next, follow the steps below to transform the dataset into four DataFrames that will match the schema in the pgAdmin tables:
NOTE
Some datasets have a large number of rows, which will affect the time it takes to complete the following steps.
The customers_table DataFrame
To create the customers_table, use the code in the Amazon_Reviews_ETL_starter_code.ipynb file and follow the steps below to aggregate the reviews by customer_id.
- Use the
groupby()function on the customer_id column of the DataFrame you created in Step 6. - Count all the customer ids using the
agg()function by chaining it to thegroupby()function. After you use this function, a new column will be created,count(customer_id). - Rename the
count(customer_id)column using thewithColumnRenamed()function so it matches the schema for thecustomers_tablein pgAdmin. - The final
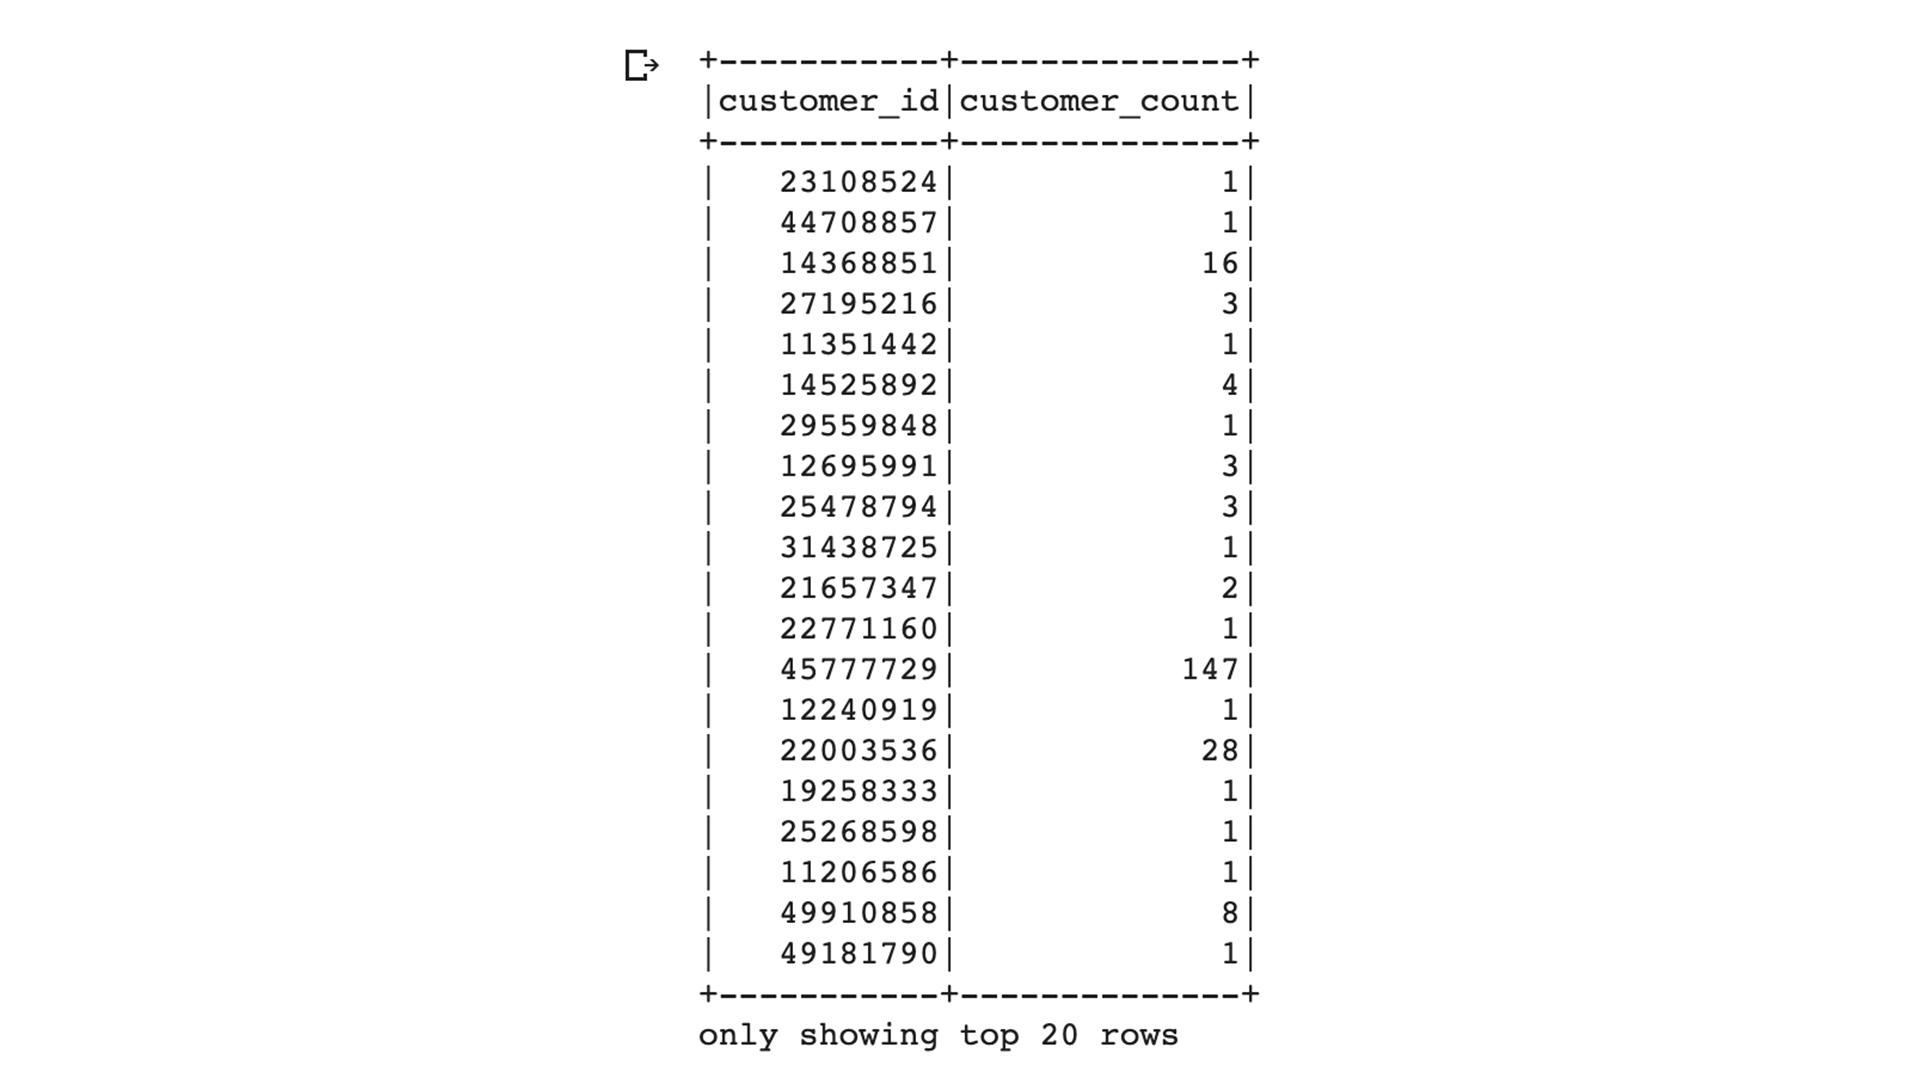
customers_tableDataFrame:
The products_table DataFrame
To create the products_table, use the select() function to select the product_id and product_title, then drop duplicates with the drop_duplicates() function to retrieve only unique product_ids. Refer to the code snippet provided in the Amazon_Reviews_ETL_starter_code.ipynb file for assistance.
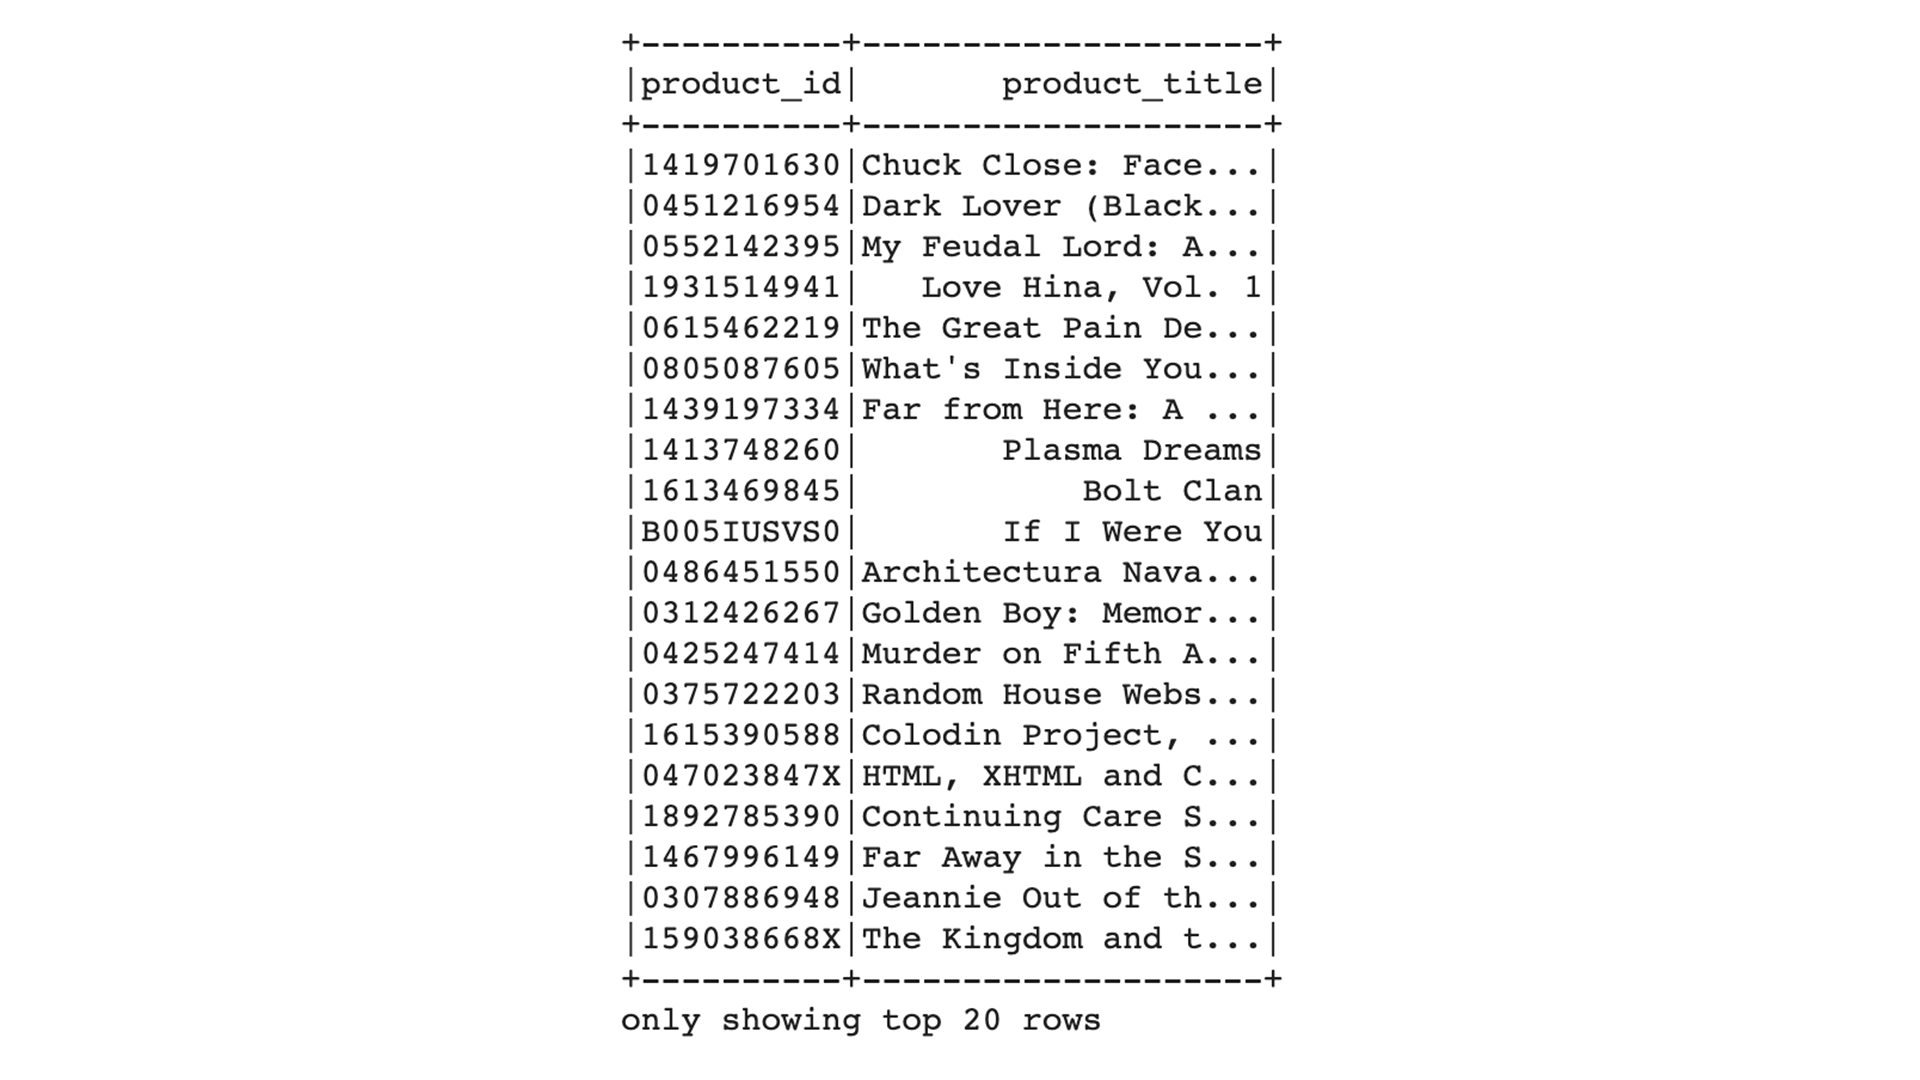
The final products_table DataFrame:
The review_id_table DataFrame
To create the review_id_table, use the select() function to select the columns that are in the review_id_table in pgAdmin, and convert the review_date column to a date using the code snippet provided in the Amazon_Reviews_ETL_starter_code.ipynb file.
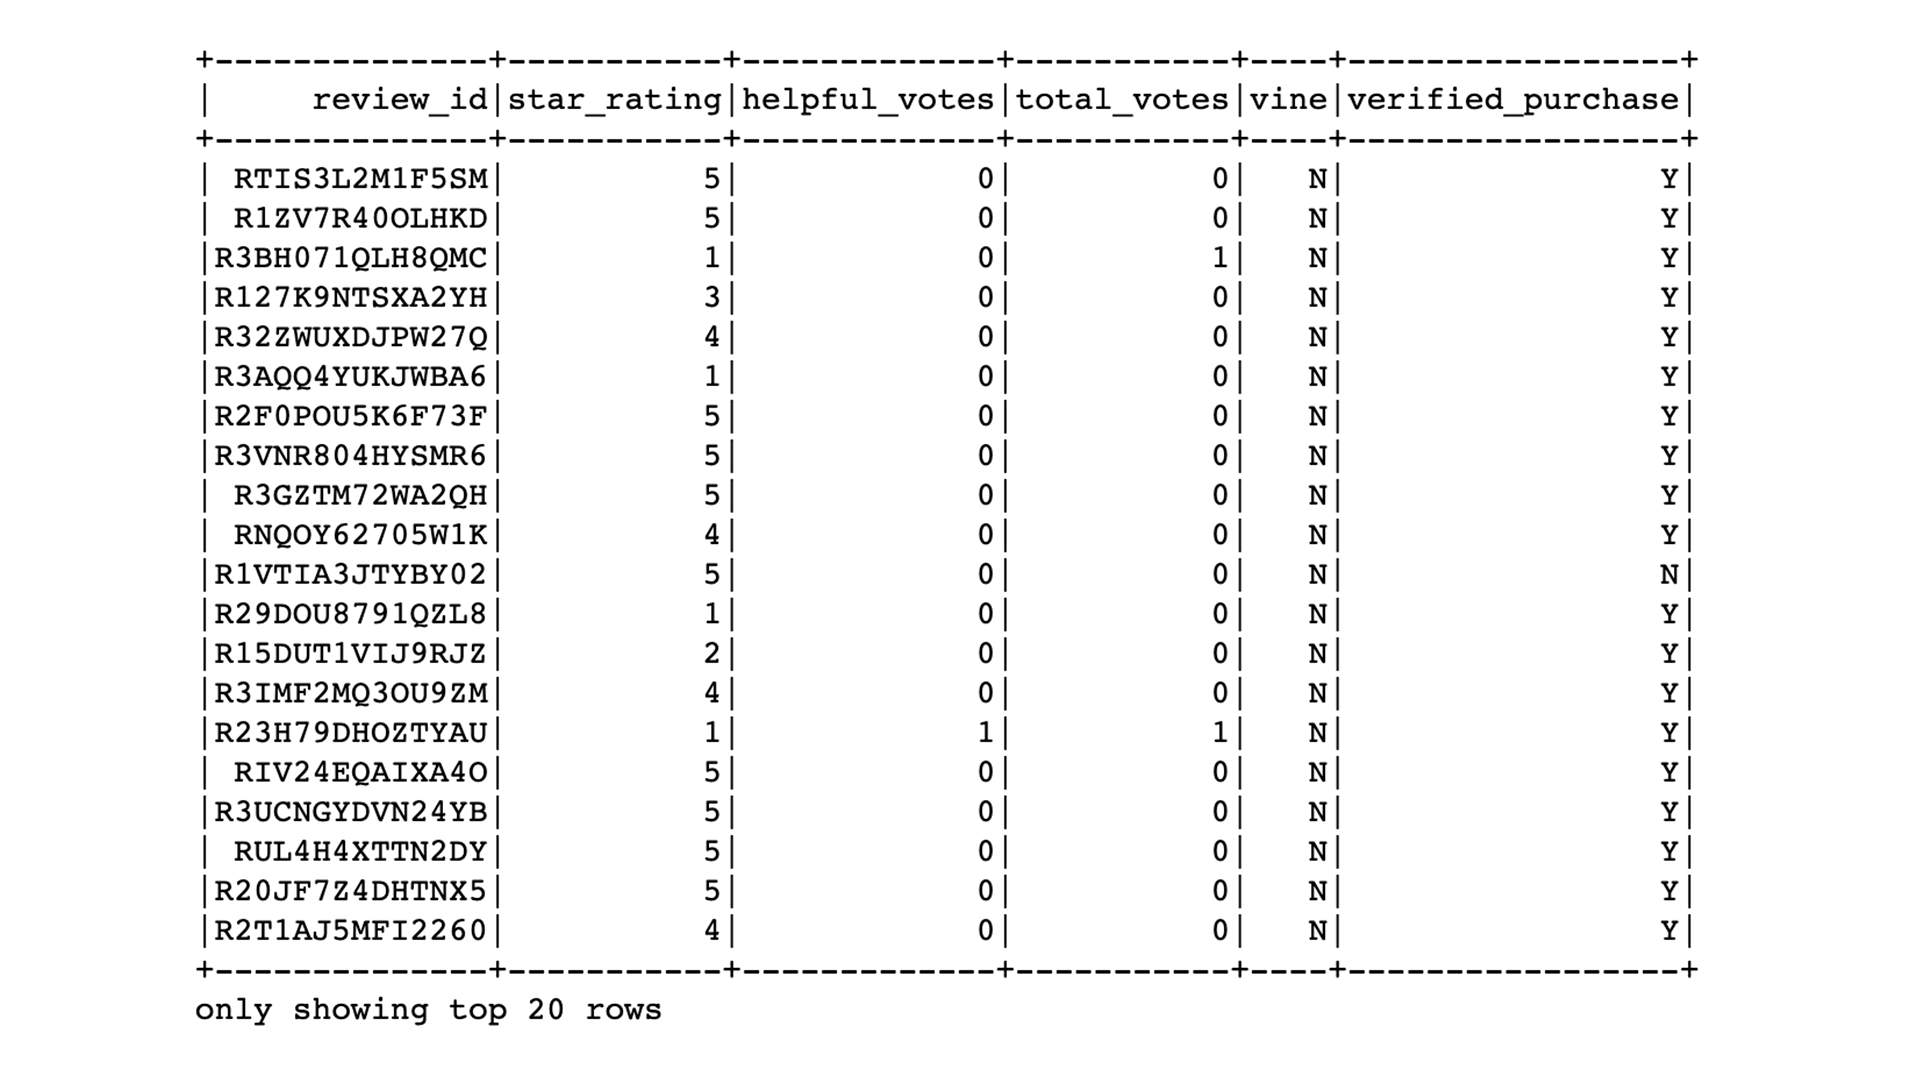
The final review_id_table DataFrame:

The vine_table DataFrame
To create the vine_table, use the select() function to select only the columns that are in the vine_table in pgAdmin.
The final vine_table DataFrame:
Load the DataFrames into pgAdmin
- Make the connection to your AWS RDS instance.
- Load the DataFrames that correspond to tables in pgAdmin.
- In pgAdmin, run a query to check that the tables have been populated.
Then, export the Amazon_Reviews_ETL Google Colab Notebook as an ipynb file.
RESULTS:
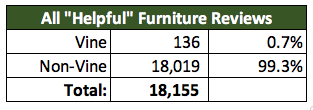
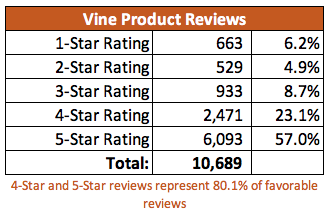
Helpful Reviews (All) with 5 Star:
For all reviews and "helpful" reviews, around half of the ratings are 5 stars, which indicates that the Vine programs tend to give 5 Stars over any other rating.

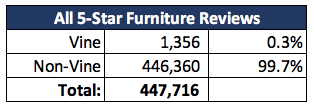
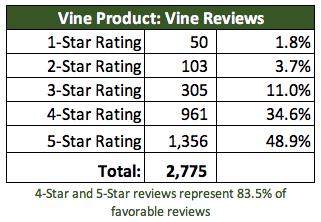
Percentage of Vine Reviews are 5-star:
For all the Vine Reviews, we found almost the same, a little lower ratings than 5 Star.

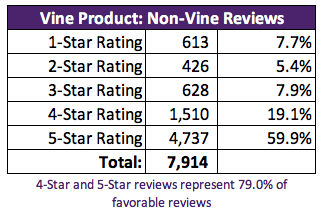
Percentage of Non-Vine Reviews are 5-star: In General, the non-Vine reviews is higher of 5 Stars on non-Vine reviews than 5 Star Vine.

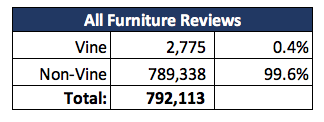
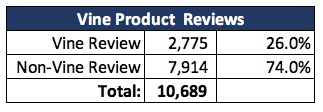
Vine Review vs. Non-Vine Review: For the entire Furniture product review file, the majority has a small Amazon Vine review:
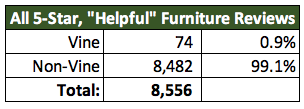
Now, applying the same analysis over smaller dataset, with "helpful" reviews, we faound an average percentage from the Vine program:
5 Star Reviews Vine vs Non-Vine: For the entire review dataset, we found a small 5 Star reviews from Vine reviews, around 0.3%
By Filtering the "helpful" reviews only, we saw and found a light difference; a lower 1% of the 5 Star review from Vine.
SUMMARY
- The majority of reviews for Furniture products are almost nothing or lower results from Vine participants: 99.6% are Non-Vine.
- And overall all 5 Star reviews are also the same as the Furniture, all are from Vine participants: 99.7% of all 5-star reviews are non-Vine.
- But we need to highlight that not all of the 5 Star reviews are coming from Vine participants.
In addition, we found that much data isn't Vine reviews over specific products, that we could minimize the resluts and create a different dataset on just Vine products.
The analysis gave us that 1/4 are Vine Reviews
Specific Product provide an average of 57% 5 Star reviews
For the majority of Vine Reviews, the analysis provide a 49% of 5 Star reviews
And for the majority of the non-Vine Reviews, the analysis provide a 60% of 5 Star reviews